Thematic layers
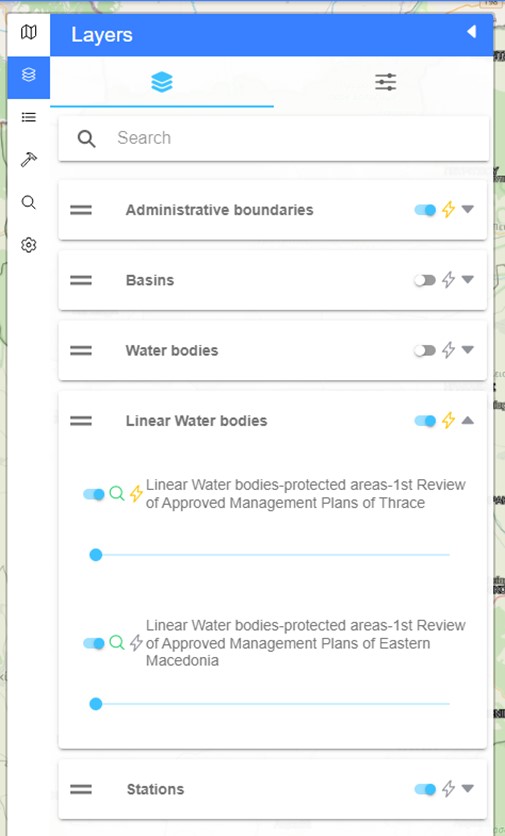
The next function is the thematic layers tab. Here, the user can choose which layers will appear on the map as well as their amount of detail. More specifically, the following tools allow to (Figure 9):
![]() arrange the order of the thematic layers according to user’s interests
arrange the order of the thematic layers according to user’s interests
![]() switch between activated/deactivated view of the thematic layer
switch between activated/deactivated view of the thematic layer
![]() toggle the eligibility of a thematic layer. When the symbol is activated, the user chooses to see all the information related to the specific object, when using the "Map Object Recognition" (info) button. Only the objects that have the eligibility turned on and are enabled can show results with the “info”. By default, all the elements of eligibility and visibility are disabled, leaving the user the possibility to choose the level of information they want according to their needs and preferences. Finally, there is the possibility to search for a thematic layer with the search field.
toggle the eligibility of a thematic layer. When the symbol is activated, the user chooses to see all the information related to the specific object, when using the "Map Object Recognition" (info) button. Only the objects that have the eligibility turned on and are enabled can show results with the “info”. By default, all the elements of eligibility and visibility are disabled, leaving the user the possibility to choose the level of information they want according to their needs and preferences. Finally, there is the possibility to search for a thematic layer with the search field.
. 
- Actions
On the second tab of the Thematic Layers is the “Actions”, in which the following options/actions exist:
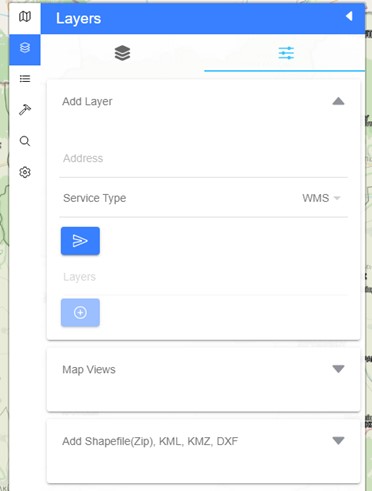
- Add a new layer
The user has the option to add extras layers in wms, wfs, esri dynamic map and esri feature formats (Figure 10). They can type their URL address and connect to the layer with the “connection’ button ![]() . With the add tool
. With the add tool ![]() the user adds the selected layer on the relevant layer list.
the user adds the selected layer on the relevant layer list.
- Map views
On the map views the user can save the current map by giving them a title and click on the “+” button. They can also define the current map view as the default on for the home page by clicking on the home button ![]() . Then the saved map views appear as a list. The user can zoom/focus on the specific map view or even delete it (Figure 11).
. Then the saved map views appear as a list. The user can zoom/focus on the specific map view or even delete it (Figure 11).
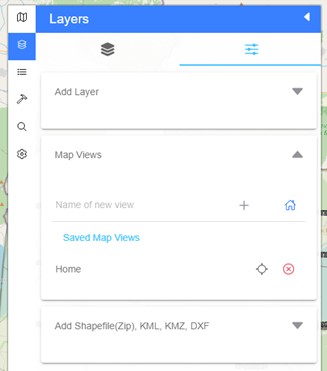
Figure 11: Saving the map view
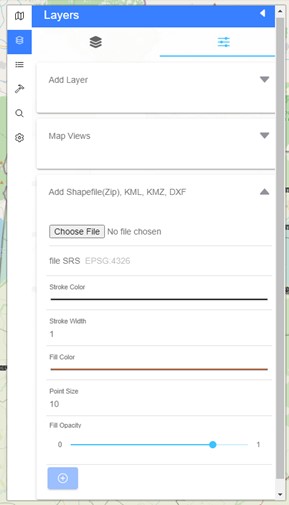
- Adding a shapefile(zip), kml, kmz, dxf layer
The user can also add external layers, saved on their local drive, with the “choose file” button. The layer can be either a shp, kml, dxf or a kmz file. Once the layer is added, the user can change the colour, width, fill colour, the point size and the fill opacity (Figure 12).